Table of Content
- Understanding Ultrasonic Testing
- Types of Ultrasonic Waves
- Process of Ultrasonic Testing
- Ultrasonic Testing of Welds
- Ultrasonic Testing of Welds for Flaw Detection
- Ultrasonic Testing in Welding for Thickness Detection
- Advantages of Ultrasonic Testing
- Where can I learn NDT?
- How do I Scan a Weld Joint?
- Conclusion
Ultrasonic Testing (UT) emerges as a vital tool in the arsenal of non-destructive testing techniques as it ensures the quality and integrity of weld joints.
This method allows for the detection of defects and irregularities within welds, helping to prevent potential failures that could have serious consequences.
Ultrasonic Testing involves the use of ultrasonic sound waves to detect defects inside a material.
The welded joints have the possibility of defects inside the welds or somewhere near the weld zone.
The few defects that are often found in welds are Porosity, Cracks, Slag Inclusion, Lack of fusion, Lack of Penetration, Root concavity, Crater pipes, sharp undercuts, burn-through, HAZ cracks, and much more.
These defects are located deep and cannot be viewed manually; ultrasonic scanning is used to detect these discontinuities. The conventional Ultrasonic Testing of weld joints method shown here is totally operator-reliable.
Therefore, international bodies require the operator to be qualified as per a standard, and the machine used also meets the requirements.
Understanding Ultrasonic Testing
Ultrasonic Testing is a non-invasive inspection technique that uses high-frequency sound waves to evaluate the internal structure of weld joints and materials.
This method is particularly useful for identifying flaws such as cracks, voids, inclusions, and porosity that may compromise the weld's strength.
The principle behind ultrasonic testing lies in the transmission of sound waves into the material being inspected and the interpretation of the echoes that bounce back.
Types of Ultrasonic Waves
Here are various types of ultrasonic waves
1. Longitudinal Waves
Longitudinal waves, also known as compression waves or "L-waves," are a fundamental type of ultrasonic wave used in testing.
These waves involve the vibration of particles in the same direction as the wave's propagation.
In weld joint testing, L-waves are effective in detecting volumetric defects such as voids and inclusions.
Their ability to penetrate deeply into materials makes them an essential tool for assessing the internal quality of welds.
2. Shear Waves
Shear waves, or "S-waves," involve particle motion perpendicular to the direction of wave propagation.
These waves are sensitive to changes in the material's elasticity and can detect flaws oriented parallel to the wave's direction.
Shear waves are particularly valuable for assessing weld joints with complex geometries, as they offer a more versatile approach to flaw detection.
3. Surface Waves
Surface waves, as the name suggests, travel along the surface of a material. These waves are divided into two types: Rayleigh waves and Love waves.
Rayleigh waves have both longitudinal and transverse motion, making them suitable for detecting surface-breaking defects.
Love waves, on the other hand, have a horizontal shearing motion and are valuable for examining near-surface weld flaws.
4. Lamb Waves
Lamb waves, named after Horace Lamb, are guided waves that propagate in plates or other thin structures.
These waves offer the advantage of inspecting a larger area of material from a single transducer position.
They are commonly used in weld testing for their ability to detect defects distributed over a wide area.
Process of Ultrasonic Testing
Ultrasonic Testing is a powerful non-destructive inspection technique employed to evaluate the integrity of weld joints and materials.
1. Methods of Receiving Ultrasound
a. Reflected Transmission
In the reflected transmission method, a transducer sends a high-frequency sound wave into the material being inspected.
This sound wave penetrates the material until it encounters a boundary between different materials or a defect within the material.
At this point, some of the sound wave energy is reflected back to the transducer.
By measuring the time it takes for the reflected wave to return and knowing the velocity of sound in the material.
This method is highly effective for detecting internal flaws and defects.
b. Through/Attenuated Transmission
Through or attenuated transmission involves sending sound waves through one side of the material and receiving them on the opposite side.
The sound waves that pass through the material will be attenuated (weakened) due to interactions with the material's internal structure.
By analyzing the degree of attenuation, inspectors can gather information about the material's properties and identify defects that cause changes in sound wave behavior.
2. Angle of Sound Waves
a. Normal Beam
In the normal beam configuration, sound waves are transmitted perpendicularly to the material's surface.
This setup is particularly effective for detecting defects and flaws that are perpendicular to the surface.
It's commonly used in weld testing to assess weld quality and detect flaws that might be oriented parallel to the weld's surface.
b. Angle Beam
Angle beam testing involves sending sound waves into the material at an angle other than 90 degrees.
This method is useful for inspecting weld joints for defects that might not be readily visible using normal beam testing.
Angle beam testing is especially advantageous when examining materials with complex geometries or when looking for flaws that are oriented diagonally or parallel to the surface.
3. Method of Coupling
a. Contact
Contact coupling involves placing the transducer directly on the surface of the material being inspected.
A coupling agent, often a gel or grease, is used between the transducer and the material to ensure efficient transmission of sound waves.
This method is suitable for inspecting materials with flat surfaces and is commonly used in industrial settings.
b. Immersion
Immersion testing requires immersing the material in a liquid bath, often water, to ensure proper sound wave transmission.
The transducer sends sound waves into the liquid, which then travel through the liquid and enter the material.
This method is preferred when inspecting materials that have irregular surfaces or complex shapes.
c. Non-Contact
Non-contact coupling involves using air as the medium for sound wave transmission.
Air-coupled transducers generate and receive sound waves without direct contact with the material.
This method is ideal for materials that cannot be in direct contact with coupling agents due to their fragility or high temperatures.
Ultrasonic Testing of Welds
Ultrasonic Testing is an indispensable technique in the realm of welding inspections, offering unparalleled precision in flaw detection and thickness assessment.
Moreover, we explore the numerous advantages that make Ultrasonic Testing a preferred choice for ensuring the quality and integrity of weld joints.
Ultrasonic Testing of Welds for Flaw Detection
Flaw detection is at the core of ultrasonic testing's application in Welding inspections.
When welds are subjected to ultrasonic waves, any internal flaws such as cracks, voids, inclusions, or porosity can disrupt the smooth passage of these waves.
This disruption causes the waves to bounce back to the transducer, generating an echo that can be analyzed.
By studying the time taken for the echo to return and its characteristics, inspectors can accurately determine the presence, location, and size of defects within the weld.
This meticulous flaw detection process ensures that welds meet stringent quality standards, preventing potential failures and ensuring structural integrity.
Ultrasonic Testing in Welding for Thickness Detection
Ultrasonic Testing is also a reliable method for assessing the thickness of materials, which is crucial in welding applications.
By directing ultrasonic waves into a material, technicians can measure the time it takes for the waves to travel through the material and reflect back.
This time measurement, combined with the known velocity of sound in the material, allows for the precise determination of material thickness.
Whether it's monitoring the thickness of pipes, tanks, or structural components, ultrasonic testing provides accurate thickness measurements that are essential for maintaining safety and compliance standards.
Advantages of Ultrasonic Testing
The advantages of ultrasonic testing in Welding inspections are manifold and contribute to its widespread adoption across industries:
Accurate Flaw Detection
Ultrasonic Testing can identify flaws both on the surface and within the material, offering comprehensive flaw detection for welds and ensuring structural integrity.
Non-destructive Nature
Unlike destructive testing methods that may compromise the integrity of the weld, ultrasonic testing is non-destructive, allowing the weld to remain functional after inspection.
Depth Penetration
Ultrasonic waves can penetrate deep into the material, making it possible to detect flaws that are not visible on the surface.
Real-Time Results
Ultrasonic testing provides immediate results, enabling inspectors to make quick decisions and take necessary actions based on the inspection findings.
Versatility
The technique is versatile, and applicable to a wide range of materials, shapes, and sizes, making it suitable for diverse industries.
Cost-Effectiveness
Early flaw detection through Ultrasonic Testing prevents costly rework, repairs, and potential failures, ultimately saving both time and money.
Enhanced Safety
By identifying defects and weaknesses in welds, ultrasonic testing contributes to safer structures, machinery, and equipment, reducing the risk of accidents.
Where can I learn NDT?
The certification may be ASNT Level 1, Level II, Level III, or PCN or ISO 9712 qualification. There are many good NDT Training Institutes for NDT certifications; one among them is AQC (Advanced Quality Centre).
How do I Scan a Weld Joint?

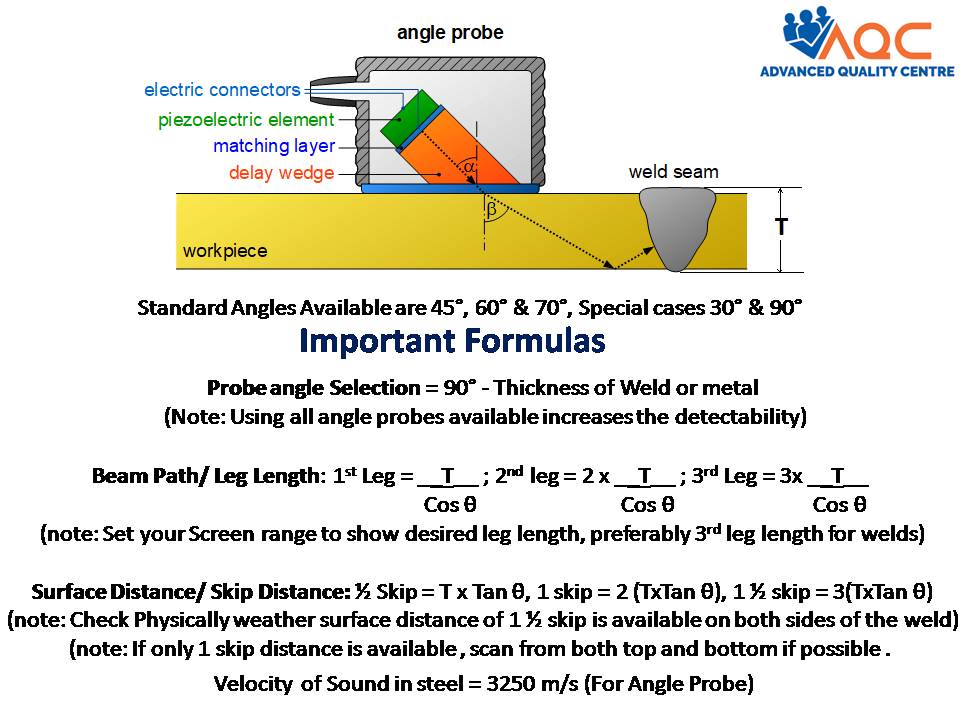
Initially, select the appropriate probe for scanning welded plates or pipes.
Select the highest frequency available (for example, 4 MHz or 6 MHz) for high-sensitivity inspection.
Generally, scan from half skip distance to One and a half skip distance for complete scanning of the weld thickness.
If not possible, at least scan from 12 to 1 skip distance, but scan from both sides of the plate (top and bottom).
The exact location and depth of the defect can be found during the above scanning method.
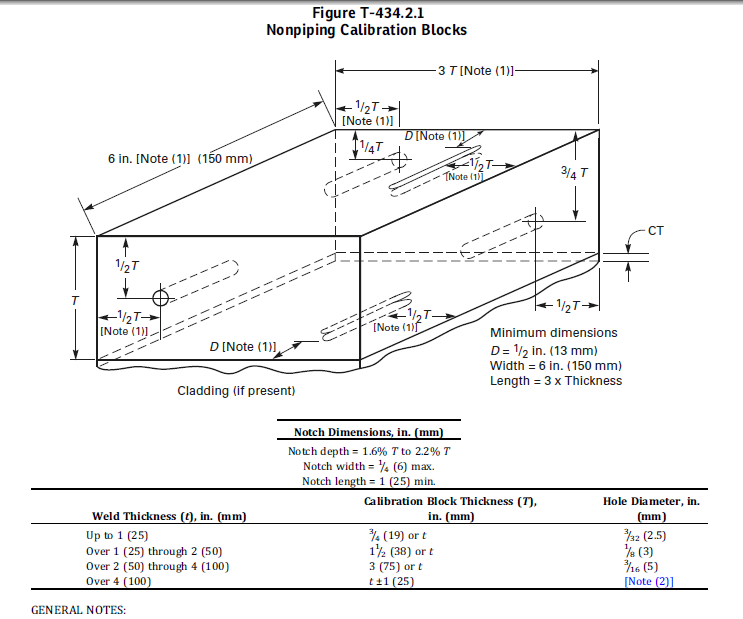
But to evaluate the size of the defect, we always need a reference method such as DAC (distance Amplitude curve), DGS (distance Gain sizing), or any other.
To draw a DGS curve, we need a reference block of equal weld thickness, or we can also use standard equivalent-size reference blocks as mentioned in ASME Section V for NDT Article 4 (as shown here).
The exact location and depth of the defect can be found during the above scanning method.
But to evaluate the size of the defect, we always need a reference method such as DAC- Distance Amplitude Curve, DGS- Distance Gain Sizing, or any other.
To draw a DGS curve we need a reference block of equal weld thickness or we can also use standard equivalent size reference blocks as mentioned in ASME section V article 4 (as shown here )

Conclusion
Ultrasonic Testing of weld joints stands as a cornerstone of non-destructive testing methodologies.
Its ability to accurately detect flaws using various types of waves makes it an indispensable technique across industries where weld quality is paramount.
The process of ultrasonic testing encompasses various methods and techniques that collectively contribute to its precision and effectiveness in evaluating weld joints and materials.
By understanding the intricacies of receiving ultrasound, the angle of sound waves, and the methods of coupling, professionals can make informed decisions about which approach best suits their specific inspection needs.
Ultrasonic testing continues to play a pivotal role in ensuring the structural integrity of critical components across diverse industries, safeguarding against potential failures, and enhancing safety standards.
Ultrasonic testing is a cornerstone of weld inspections, serving as an effective means for flaw detection and thickness assessment.
Its ability to provide accurate, Non-destructive Testing, and real-time results while offering a range of advantages underscores its importance in ensuring the quality and safety of weld joints.
As industries continue to demand precision and reliability, ultrasonic testing remains a steadfast tool for upholding standards, preventing failures, and promoting the longevity of critical components. Check out OnestopNDT for more articles.


