Ultrasonic NDT
Wave Nozzle Inspection
Published on 19th October 2020

Nodes and nozzles are difficult to inspect due to a combination of varying geometry, tight angles and different part thicknesses.
Reflections on an A-Scan can be difficult to interpret. They may look as if they are coming from within the weld, but in fact, due to the probe positioning around the part, these reflections may come from the land area behind the weld. A false call may result.
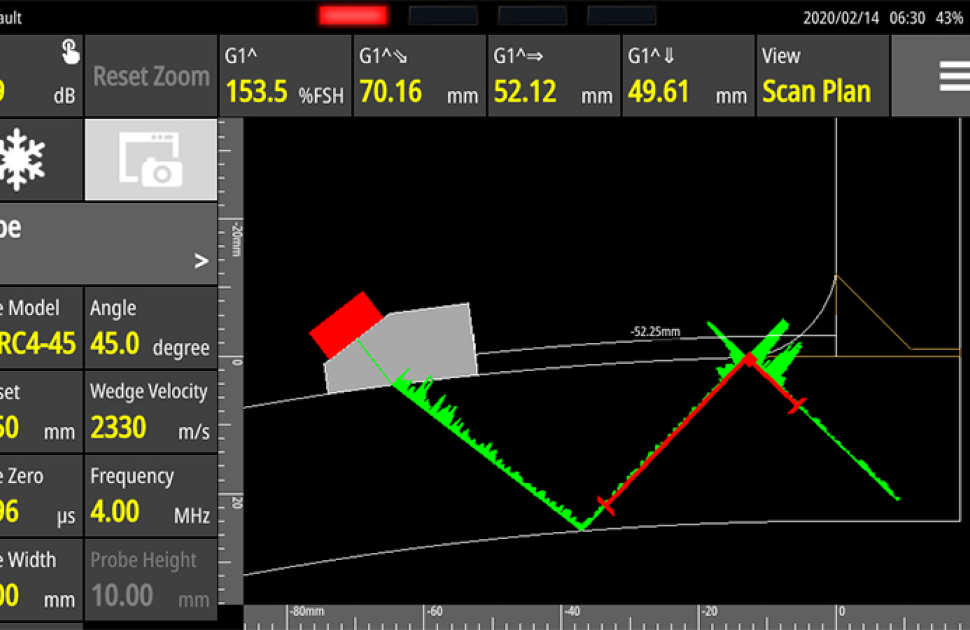
By utilising the WAVE’s unique live ray tracing ability, the inspector is given greater confidence in their result. The ability to screen shot the scan plan also enables more detailed reporting, giving clear and precise images of where the defect, if any, is positioned within the welded area.
Images above show toe crack on A-Scan and Ray Tracer
Images above show lack of side wall fusion on A-Scan and Ray Tracer
Inspection Procedure:
The tests shown in the data images were performed on two different samples, one being a pipe to pipe node, and the other a pipe to pipe nozzle with a 120 degree angle. The wall thickness of the pipes varied between 15mm and 25mm.
The probes used in this inspection were 4MHz, 45, 60 and 70 degree Sonatest Starc shearwave transducers. The transducers were positioned on both the main pipe and the nozzle/node itself depending on the area of the weld in which we were trying to detect a defect.
Practical Outlines:
Need for inspection:
Node/nozzle welds can be put under large amounts of stress and strain depending on what the pipeline is being used for; therefore, inspection is critical for safety.
During the welding process, defects can be introduced such as slag and porosity. Over time and as a result of stress these defects can grow, or cracks can begin to form in certain high-risk areas around the weld.
In order to be certain that these welds are suitable for operation, vigorous NDT needs to take place and with the new Sonatest WAVE a technician’s confidence in correctly calling defects is increased.
Benefits of inspection using WAVE:
The Sonatest WAVE has live ray tracing capabilities, this means the operator can draw a scan plan of the part and then adjust the probe offset. When an indication appears on the A-Scan, the technician changes to the ray tracer view with one touch, moves the probe to the correct offset and then the unit will show them where the reflection is coming from.
The Sonatest WAVE is also a very fast and user-friendly instrument, as well as the ray tracer, it is possible to create unique applications to suit specific inspections, removing menus or creating bespoke menus with only the necessary parameters in them.
While the inspection is underway, screenshots can be easily taken by one touch, making reporting much easier. These images can be quickly downloaded using Sonatest “companion” software and then placed into reports so that the customer has a clear visual identification of where a defect is positioned within the weld.
The Sonatest WAVE gives greater confidence for inspectors and clients by giving clear and precise images of where a defect is located or even identifying if a reflection is from a defect, geometry or mode conversion.
PAUT can also be used for this inspection, often though a special scanner is required which adds to the cost of a PAUT set and transducer. Awkward geometry can also cause multiple reflections when using this method, causing more potential confusion. With the WAVE simple but effective ray tracer, all reflections can be easily identified as either a defect, geometry and mode conversion.
Industries:
- Oil & Gas
- Petrochemical
- Power Generation
- Construction
Typical Parts:
- Nodes
- Nozzles
- Trunnion
Inspection Techniques:
- Manual UT
- Interactive scan plan
Features & Benefits:
- Full touch screen capabilities
- Fast set up and calibrations
- Ability to modify applications for specific jobs
- Complex part & weld geometry modelling
- Live ray tracing software for enhanced defect positioning
- Reduces likelihood of mistaking defects for geometrical reflections
Recommended Tool Package
- Sonatest WAVE
- Starc Weld set (2 MHz or 4 MHz)
- Couplant
For further information or support, please contact the Sonatest Applications Team: applications@sonatest.com
Source: https://sonatest.com/resources/application-notes/wave-nozzle-inspection


