Back to Companies

Qualtech NDE

Qulatech NDE is pleased to introduce our services as one of the newly established inspection companies in the field of NDT, enjoying a good reputation for timely completion of projects and quality workmanship. All inspection activities performed by us are through our in-house resources.

Service

Pakistan

Visit Website
Overview

Qualtech NDE is pleased to introduce our services as one of the newly established inspection companies in Non-Destructive Testing (NDT), enjoying a good reputation for timely completion of projects and quality workmanship. All inspection activities performed by us are through our in-house resources.

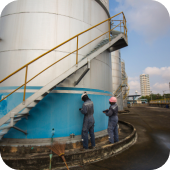
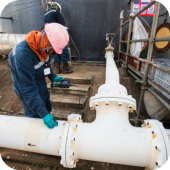
Their qualified engineers and inspectors with a devoted team of workers have completed several challenging works and satisfied the clients with their professional and sincere services. Their experienced and trained engineers always fulfil their commitment within a scheduled time amid safety and quality. They assure you that they can perform complete NDT inspection of storage tanks, steel structures, power plant turbines & generators, pipeline welds, and process industry components, backed by highly professional skills, capable technical staff, equipment and inspection procedures.

Products & Services
Dye Penetrant Inspection

This type of inspection is used to identify forging, casting and welding surface defects. Such defects include hairline cracks, surface porosity, leaks in new products, and service-induced fatigue cracks. Liquid Penetrant Testing (PT) is a non-destructive testing method used to locate surface-breaking discontinuities in non-porous materials, this method may be applied to ferrous and non-ferrous materials. However, for ferrous material components magnetic particle inspection is usually preferred.

Application DPT: 

  1. Welds and weld overlays, castings and forgings, valves and their components, machined parts, pressure vessels, clad vessel linings, and structural steel.
  2. New fabrication weld inspection.
  3. Code-compliant inspection.
  4. ASME Section V for pressure vessels.
  5. ASME B31.1 and B31.3 for piping
  6. API 1104 for pipelines.
  7. In-service welds.
  8. Ferrous and non-ferrous components.

Advantages:

  1. High visibility of indications because of contrast.
  2. Low cost and fast results.
  3. Field Ready.
  4. Highly portable tools can be used in most locations.

Limitations:

  1. Can only detect surface flaws.
  2. Conducting the test on rough surfaces, such as fabricated welds, will make it difficult to remove any excessive penetrant and could result in false indications.
  3. Penetrants are limited by temperature and special penetrants can be used for higher temperature ranges.
  4. Test material must be relatively non-porous.
Magnetic Particle Testing

This type of non-destructive testing method is used to detect surface and slightly subsurface flaws in ferromagnetic materials. Magnetic Particle Inspection (MPI) is routinely used to inspect welds, piping, pressure vessels and structural steel components.

Application:

  1. New fabrication welds for code compliance to:
  2. ASME Section V for pressure vessels
  3. ASME B31.1 and B31.3 for piping
  4. API 1104 for pipelines
  5. Castings and forgings, valves and their components, machined parts, pressure vessels, cranes and structural steel welds for cracks, non-fusion, and cold laps.
  6. In-service welds

Advantages:

Flaws are highly visible

The Equipment is:

  1. Portable and can be battery-powered
  2. Light enough to take easily onto scaffolding
  3. Non-hazardous to operations or other nearby personnel
  4. Has no effect on equipment or materials in the vicinity
  5. Very good sensitivity to fatigue cracking

Limitations:

  1. The surface must be accessible and must be clean and free from oil, grease, scale, etc.
  2. Cannot detect deep subsurface flaws
  3. Instrumentation and aircraft components require demagnetization after being inspected; residual magnetization may cause them to malfunction.
Ultrasonic Testing

This type of inspection method is capable of detecting both surface and sub-surface flaws in components and welds. Ultrasonic Testing (UT) can also be used for thickness measurement of different materials.

Application:

  1. To determine the condition of internal and/or external corrosion or erosion in process piping and pressure vessels.
  2. For new fabrication weld inspection to verify code compliance:
  3. ASME Section V for pressure vessels
  4. ASME B31.1 and B31.3 for piping
  5. API 1104 for pipelines

Advantages:

  1. It can be used to identify, locate and characterize defects that other NDE methods cannot:
  2. Capability of determining the size, orientation and nature of internal flaws
  3. High penetrating power for detection of defects deep in the material
  4. High sensitivity aids in identifying the location of extremely small flaws
  5. Only one surface needs to be available
  6. Easy to handle in the field
  7. Systems are portable and battery-powered
  8. Light enough to easily take onto scaffolding
  9. Non-hazardous to operations or other nearby personnel, and does not affect the material being inspected.

Limitations:

  1. Parts that are rough, irregular in shape, or very small or thin are difficult to inspect
  2. Surfaces must be cleared of any scale, loose paint etc. before inspection
  3. Manual Ultrasonic inspection requires experience and careful attention. 
OnestopNDT
OnestopNDT OnestopNDT OnestopNDT
OnestopNDT

Step 1 - please enter your Personal details.

Step 2 - please upload your Resume.

Thank you for submitting.

Tree PNG back

Companies

Tree PNG back

Articles

Webinars

Webinars

Tree PNG back

Jobs

Application Notes

News