
One of the main factors affecting the performance of a coating system, primarily as a protective coating, is the surface profile.
In the industrial and protective coatings industry, metal surfaces are blasted to remove troublesome mill scale, corrosion or previous coatings and also to provide an anchor pattern or profile.
Surface profile increases the surface area of the metal, creating a better key for the coating system being applied. Once a surface has been blasted to create a suitable profile, quick and accurate measurements are imperative so that the surface can be primed to prevent oxidisation.
Surface profile should not be confused with roughness
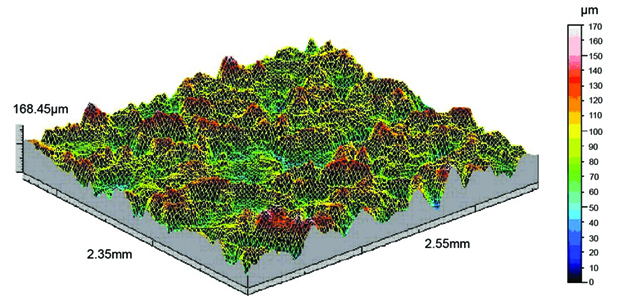
Whilst ‘profile’ and ‘roughness’ are often interchangeable terms used when describing the surface of a metal, the term ‘surface profile’ is the measurement of the peak-to-valley height. This is often expressed as an average of multiple individual readings and typically ranges from less than 25µm up to 127µm (1mil up to 5mils).
Surface roughness, on the other hand, is measured using a stylus instrument and is the combined measurements of the surface profile and the frequency of the peaks across a linear length, also known as the peak count. Whilst this data is very informative, it is often impractical to use stylus instrument on site as they are delicate precision instruments.
Creating a surface profile increases the surface area of the metal, which will therefore improve the adhesion of the coating
By creating a profile on a substrate, the overall surface area of the substrate increases significantly. The more the profile increases, the more the surface area increases, improving adhesion since the coating has more surface to anchor to.
For example, if paint is applied to a smooth, mirror finished piece of steel, it is very easy to scrape off – sometimes even with a finger nail. However, the same paint applied to a blasted piece of steel would be a lot harder to scratch off.
Why is it important to measure surface profile?
Corrosion occurs when three things come together – a ferrous material (such as a steel substrate), oxygen (from the air) and moisture. If just one of the three elements are removed, corrosion cannot happen.
Applying a coating to the steel provides a barrier between the steel and both the air and moisture, preventing corrosion. If the coating is damaged, or simply falls or flakes from the surface due to poor adhesion, then the steel will rust or corrode and in time, weaken the structure. Natural elements such as chlorides, sulphates and nitrates can act as a catalyst in this corrosion process.
Along with surface cleanliness, measuring surface profile helps to ensure that the surface of the substrate is in the condition specified by the coating supplier for the applied coating to perform as required.
What surface profile is required?
The surface profile required is specified by the coating manufacturer or the coating specification agreed to by all parties.
Typically, the surface profile specified is the peak-to-valley height in either microns or mils and the dry film thickness is also specified in either microns or mils. It is important that the required coating thickness must be applied to both the valleys and the peaks.
If the profile is too high, the amount of paint required to cover the peaks significantly increases. More paint will be needed to ensure the high peaks remain coated. Peaks that are left uncoated or too thinly coated are at risk of rust spots or pinpoint rust (rust rash).
If the profile is too low then there may be an insufficient surface area to provide a suitable anchor for the coating - leading to poor adhesion and premature coating failures.
How do we measure surface profile?
There are a number of methods for measuring surface profile, they all work in different ways and measure different parameters.
Surface Comparators are flat, metal plates which contain a number of reference surface profiles. The comparator is placed on the surface which is compared with the reference profiles through either sight or touch. The profile is then determined and recorded. While this is a quick assessment of the surface profile, it’s a highly subjective method of measurement, as it can come down to the opinion of one person over another.
A widely used and less subjective alternative is the Replica Tape method.
A tape with a compressible memory foam pad is applied to the surface, and rubbed with a burnishing tool. By rubbing the tape into the surface, the foam is pushed into the profile, creating an inverse or mirror image of the profile. The tape is then removed and measured using a thickness gauge, such as the Elcometer 124 gauge. The replica tape method provides a maximum peak to valley height measurement of the profile.
Unfortunately, this method is time consuming – especially for profile ranges where multiple grades of tape need to be used.
A faster, more accurate and repeatable method for measuring surface profile is to use the Elcometer 224 Digital Surface Profile Gauge.
The Elcometer 224 Digital Surface Profile Gauge
With the ability to measure profiles up to 500μm (20mils), on flat or convex curved surfaces, the Elcometer 224 Digital Surface Profile Gauge provides repeatable and reproducible measurements, accurate to ±5%.
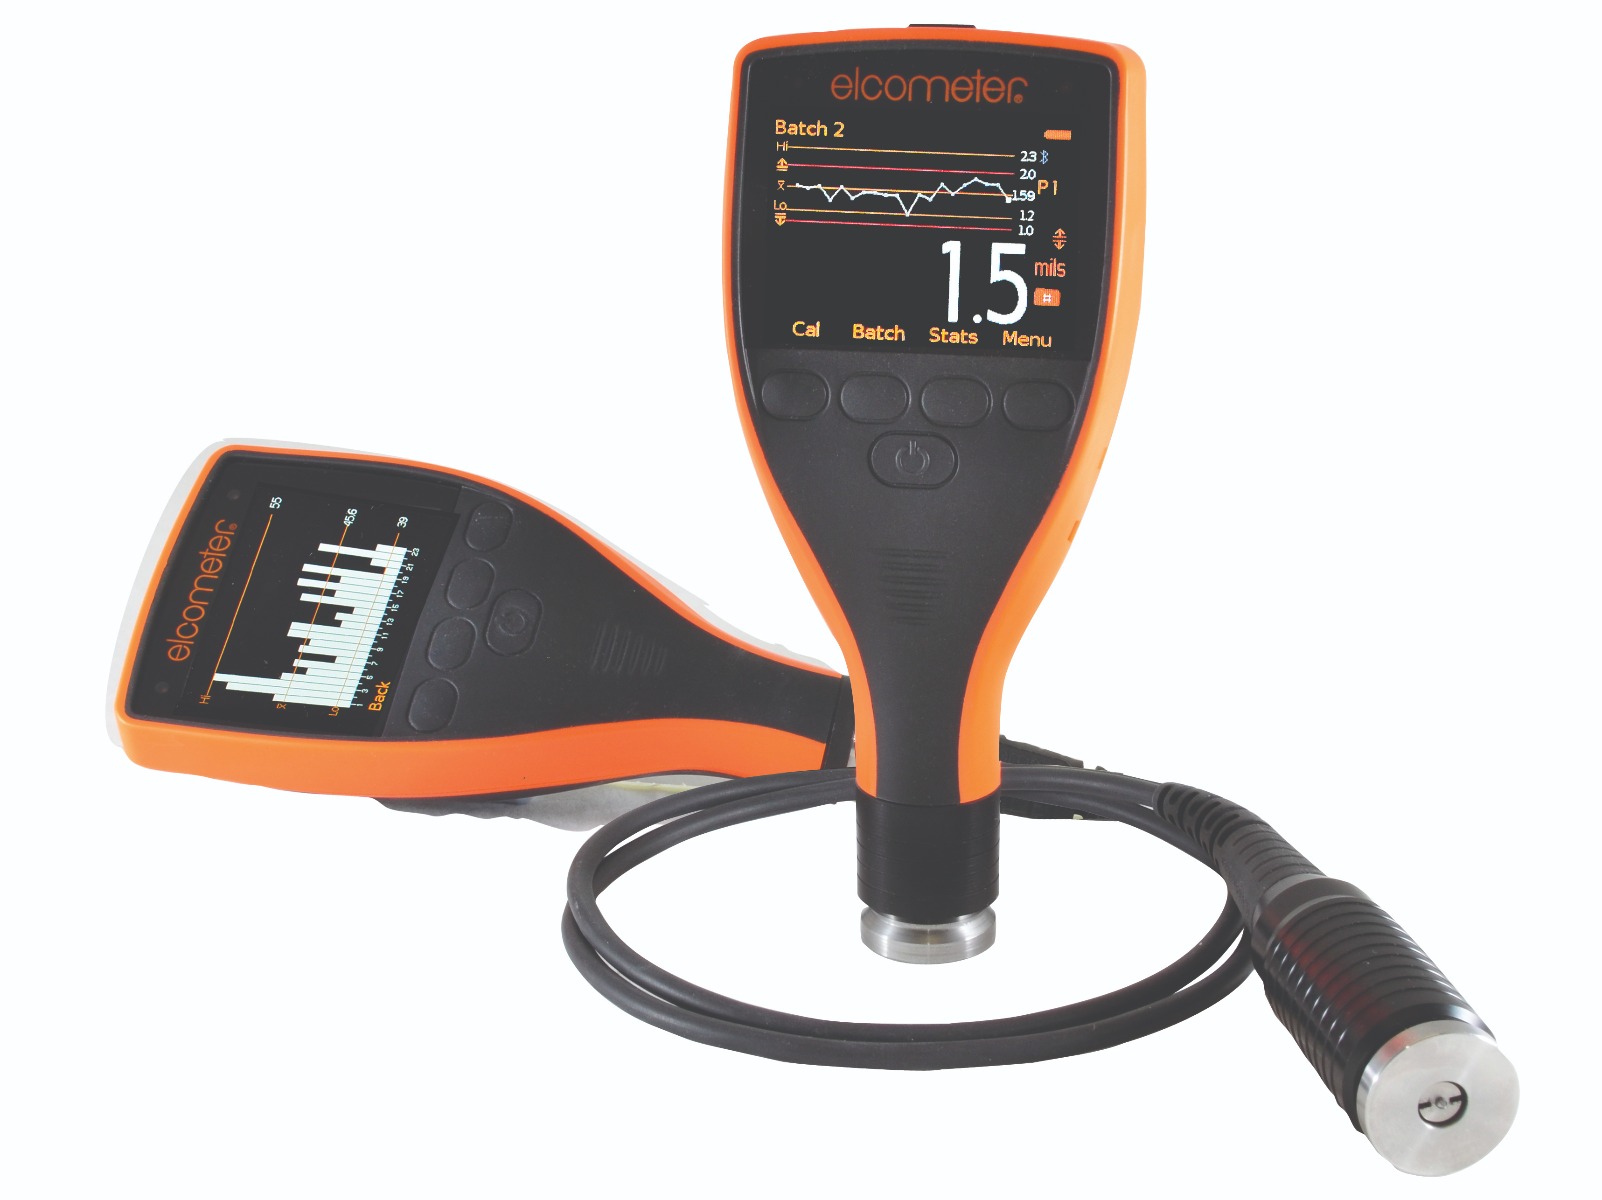
The Elcometer 224 is a needle depth gauge, which is very easy to use. Simply zero the gauge on the supplied glass slide, ensuring the probe is 90° to the substrate. Then, to take one spot measurement, place the gauge on to the blasted surface. The spring mounted needle will measure the depth of the profile from the peaks of the profile at that particular point.
As the measurement point is not necessarily at the very bottom of the valley, and could be somewhere on the slope, an average of 10 readings should be taken within a 100mm (4”) diameter area. The gauge will then provide a mean result.
In recent years, there have been changes to one of the most used profile standards, ASTM D 4417. Having previously stated that a profile measurement using a needle profile gauge should be the average of ten readings, this was changed to the maximum of ten readings.
Within the industry, concerns were raised that this was not a true characterisation of the surface and following some revision, the Standard has recently been further revised. The Standard now allows either the maximum of ten readings or the average of ten readings, which is thought to be a more realistic and statistically correct way of assessing the data and the profile.
The reading displayed on the Elcometer 224 is user selectable, and can either be the average peak-to-valley height or the maximum reading of the five or ten readings, depending on which mode is selected for the standard being worked to.
Whichever test method or Standard is being worked towards, the Elcometer 224 has a range of easy-to-use Measurement Modes
Using the very latest in surface profile measuring technology, the gauge’s measurement modes allows data to be easily collected and recorded in accordance with the relevant test method or standard.
In Custom Mode, simply select to take either 5 or 10 readings per measurement, then specify either the average, highest or lowest measurement of each set of readings to be displayed and saved into the batch memory.
In Standards Mode, select the International Standard being worked towards and the Elcometer 224 will automatically set the data collection method accordingly. When selecting ASTM D 4417, the gauge can also store either the average or highest reading as the measurement.
In Intermediate Mode, the gauge will take individual peak-to-valley measurements and save them into the batch memory. The Elcometer 224 will then automatically calculate and display key statistics. Limits can also be set using this mode, enabling the gauge to alarm whenever the reading is outside a predefined acceptable range.
Instant Live Readings Direct to PC, Tablet or Smartphone
Once the readings have been taken, they usually need to be recorded. One way is to write them down individually as they are taken and type them into a spreadsheet later; however, this is a very time-consuming method which allows for mistakes to be made.
By using Elcometer’s free data management software, ElcoMaster®, the Elcometer 224 can connect to a smartphone or mobile device via Bluetooth, and either transfer the readings from memory, or transfer each reading into the ElcoMaster® App, live as they are taken.
Each live reading can be transferred via Bluetooth® to a PC, smartphone or tablet and at the click of a button professional reports may be generated. The reports can then be emailed to clients, just seconds after the inspection has been carried out, or uploaded via cloud technology, making it accessible anywhere in the world.
GPS coordinates can also be recorded along with the surface profile when using the ElcoMaster® Mobile App. The app plots the values onto a map which is displayed on the screen, showing exactly where the readings were taken.
Portable, rugged hand-held design - ideal for field use
The Elcometer 224 Digital Surface Profile Gauge includes all the features that have come to be expected from an Elcometer designed and manufactured product, including ease of use, a fast reading rate of 50+ readings per minute and a robust and ergonomic design.
The signature orange and black gauge comes with a menu driven colour LCD display with auto rotate and user selectable statistics and display modes. Its large memory is able to store 150,000 date and time stamped readings in 2,500 batches.
Moreover, it is designed to be robust and work in the harshest of blast environments from ship building to bridge refurbishment.
Click here to view our video on how to use the Elcometer 224 Digital Surface Profile Gauge


