Ultrasonic NDT
Multi-frequency Inspection of a graphic/epoxy laminate composite with variable thickness
Published on 19th October 2020

A composite material consists of a matrix and reinforcements. The two combine to form a homogeneous material with improved properties. There are different families, but the best known are organic matrix composite materials, such as graphite/epoxy laminates. The fibres, or the reinforcements, are oriented in precise directions and the laminates are stacked one on top of the other.
Composite materials pose several challenges for ultrasonic inspection. The majority of them are anisotropic, so their properties vary depending on the chosen direction of inspection. Furthermore, these materials can have complex geometries and variations in thickness. Thus, it can be more difficult for an inspector to choose the right technique as well as the right probe frequency. With a high frequency probe, the sensitivity is increased, which makes it possible to detect smaller discontinuities. However, the attenuation is more significant with composite materials.
In short, this application note focuses on the analysis of composite material C-scans acquired at various frequencies. In addition, using the proper analysis software makes it possible to assemble all the C-scans to create images which represent the part inspected.
Fig.1 - Side view of sample
Fig.2 - Top view of sample with dimensions in inches
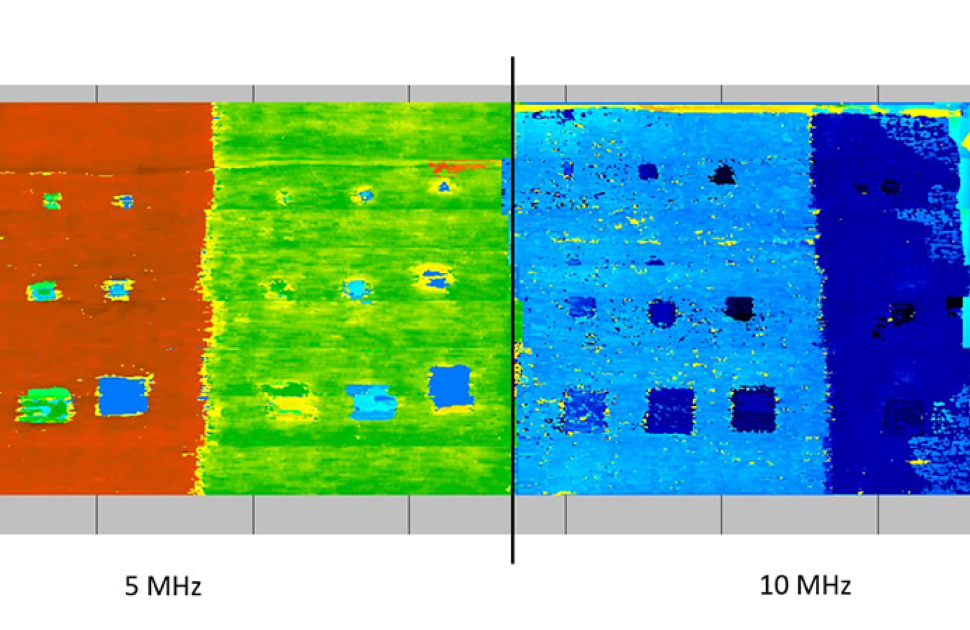
Fig. 3 – Comparison of two T-Scans in depth mode using a 5 MHz probe and a 10 MHz probe
Fig. 4 – Comparison of two T-Scans in amplitude mode using a 5 MHz probe and a 10 MHz
Fig. 5 – Utmap helps unify, in a T-Scan, the data collected by the 5 MHz probe (left) with the 10 MHz probe (right), in depth mod
Practical Outlines
Inspection Procedure
A stepped sample of graphite/epoxy laminates was used (see Figure 1 and Figure 2). Each woven step is 0.14 inch thick. There are pieces of polytetrafluoroethylene (PTFE) (commonly called Teflon) to stimulate the start of delamination, which is a flaw. The material was inspected with a 0-degree probe having a frequency of 5 MHz and another with a frequency of 10 MHz. So several C-scans have been obtained. Each C-scan can be positioned or stitched together to form a Tiled Scan (T-scan) and represent the part’s geometry. Once assembled, the T-scan represents a meaningful image for analysis and reporting.
Depth Comparison
The depth mode enables you to determine how deep the flaws are and the different steps of the steps (see Figure 3). It should be noted that the left part of the two T-Scans is the thickest part. If an area appears in shades of red, it is thicker. By the same principle, if an area appears in dark blue, it means that it is thin.
Table 1 – Observations with 5 MHz and 10 MHz Probes in Depth Mode
Advantages
- You can get a general idea of the Teflon fragments’ location, regardless of the part’s thickness.
- A flaw, such as a crease along the part’s length, is visible only with this frequency.
- When visible, the shape of the Teflon fragments is clear. This indicates that the resolution is increased at this frequency.
- Teflon fragments in the thinner sections are all detected and located precisely in the depth.
Disadvantages
- The resolution is not as good, so the flaws are not as clear compared to the data obtained using a 10 MHz probe.
- It is more difficult to notice the thickness transition for the thinner parts in the sample.
- In the thinnest section, flaws are difficult to detect in depth.
- When the sample is thicker, the attenuation is so significant and the data is less reliable, which compromises the detection of small flaws.
- Lots of gain adjustments are required due to variations in thickness.
Amplitude Comparison
The difference in amplitude of the echoes produced by the Teflon fragments makes it possible to clearly visualize and locate the flaws. Therefore, a high amplitude area is white and a low amplitude area is black. Based on Figure 4, here are the primary observations. Note that the left part of the two T-Scans is the thickest part.
Table 2 – Observations from 5 MHz and 10 MHz Probes in Amplitude Mode
Advantages
- It is possible to detect all the Teflon fragments better than in depth mode.
- Again, the crease along the part is only visible at this frequency.
- The perimeter of visible flaws is well defined. It is easy to distinguish the actual shape of this flaw.
- There is a very large amplitude difference between visible flaws and the base material. This leaves no room for misinterpretation.
Disadvantages
- Given the lack of resolution, the perimeter of the flaw is less defined than with the 10 MHz probe.
- Due to the lack of resolution, the variation in amplitude is strongly dependent upon the gate’s position in thin sections.
- The amplitude of the smallest Teflon fragments merges with the composite material in the thicker areas of the part.
- Not all Teflon fragments are visible in the larger thicknesses.
Conclusion
There is no standard frequency for inspecting graphite/epoxy laminates. In this example, the 5 MHz probe provides a global overview of flaw location. However, the latter’s resolution is low due to the lower sensitivity. The 10 MHz probe is excellent for small thicknesses and has excellent sensitivity. However, due to the great attenuation of composites, it cannot be used on thick parts. In fact, the best of both worlds would be to have multiple probes at different frequencies to inspect composites of varying thicknesses. All the same, good analysis software, such as UTmap that is able to stitch together several C-Scans, is an added value for understanding and viewing this type of data, as seen in Figure 5.
Industries
- Aerospace
- Automotive
- Composite
Typical Parts
- Graphite/Epoxy laminates
- Composite materials
- Ultrasonic attenuating materials
Inspection Techniques
- Multi-frequency inspections
- Linear array instrument
- C-Scan
- Amplitude comparison
- Depth comparison
Features & Benefits
- The RSflite user interface is optimised for composite mapping inspections.
- The UTmap, with its C-Scan stitching capability, increases overall productivity and flaw measurement precision.
- This makes the X3 series the perfect choice to perform a fairly large linear scan at 0° for applications such as composite inspections.
Recommended Tool Package
- X3A-5M-64E
- X3A-10M-64E
- RSflite
For further information or support, please contact the Sonatest Applications Team: applications@sonatest.com.


